
Google Your Way Around – How to Integrate Google Map’s Android API v2 with your Test Android application
The process of integrating Google Map’s android API v2 with your test android application mainly involves four steps:
- Download and configure the Google play services SDK
- Obtain API key
- Specify settings in the application manifest
- Add a map to your new or existing android application
1. Download and configure Google play services SDK
In eclipse, the Google play services SDK can be downloaded using SDK manager.
To install Google Play services
1.1.Launch the SDK Manager
- From Eclipse, select Window > Android SDK Manager
1.2. Install the Google Play services SDK
- It opens up a new window with list of all installed and uninstalled packages in eclipse
- Scroll to the end of package list, expand Extras, select Google Play services, and install it.
- The Google Play services SDK is saved in your Android SDK environment at
<android-sdk>/extras/google/google_play_services/
1.3 .Install a compatible version of the Google APIs platform
If you want to test your app on the emulator, expand the directory for Android 4.2.2 (API 17) or in a higher version in the Android SDK Manager, select Google APIs, and install it.
Then create a new android virtual device manager with Google APIs as the platform target.
1.3.1 How to create an Android Virtual Device
To create an AVD:
a. Start the AVD Manager:
In Eclipse: select Window > AVD Manager
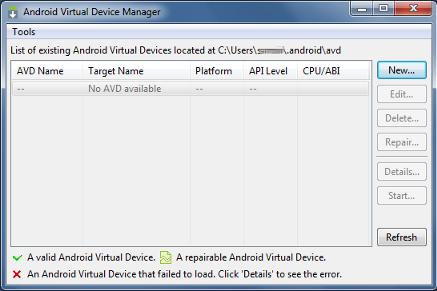
b. In the above window, you’ll see a list of existing AVDs. Click New to create a new AVD:
The Create New AVD dialog box appears.

Fill in the details of the AVD.
Note: While selecting the target, select only Android 4.2.2 and higher versions of the Google APIs platform because only those include Google Play services.
1.4 Make a copy of the Google Play services library project.
Copy the library project from
<androidsdk>/extras/google/google_play_services/libproject/google-play-services_lib/
to the location where you maintain your Android app projects.
1.5 Import the library project into your workspace
Click File > Import, select Android > Existing Android Code into Workspace, and browse to the copy of the library project to import it.
Now you have successfully downloaded and configured Google play services SDK.
Now the next step is to:
2. Obtain the API key
To access the Google Maps servers with the Maps API, you have to add a Maps API key to your application which is free and is obtained from the Google API’s console.
It involves the following steps :
2.1 Retrieve information about your application’s certificate.
The Google Maps uses SHA-1 fingerprint (short form of your application’s digital certificate) to identify your application
Your Application may have two certificates:
a. Debug certificate:
- It is used only in case of testing purpose, and not for release purpose.
- You can generate an API key from this certificate, but only use the key for testing, never for production.
Generating the SHA-1 fingerprint:
1.Locate the debug.keystore file (created first time you build your project)
In Eclipse to find the path to debug.keystore, select Windows > Prefs > Android > Build

2.2 Once you locate your debug.keystore, the next step is to list the SHA-1 fingerprint.
Simply enter the
keytool -list -v -keystore “C:\Users\your_user_name\.android\debug.keystore” -alias androiddebugkey -storepass android -keypass android
in your command prompt.
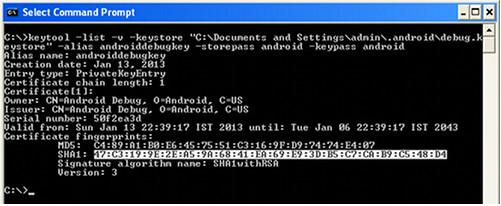
Note: Change the path of the keystore to the path specified in the “windows>preference>build”
Now that you got the SHA-1 fingerprint , you need to register with the Google API’S console.
In a browser navigate to link,
- Login to your gmail account
- Opens up the Google API’s home page; if you haven’t used Google Api console yet, you’re prompted to create a project

On the next page, this name appears in the upper left hand corner.
3. Select Services from the left navigation bar to activate GoogleMaps APIv2 services
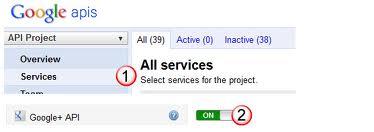
Now you are ready to get a Maps API key.
- In the left navigation bar, click API Access
- In the resulting page, click Create New Android Key
- In the resulting dialog, enter the SHA-1 fingerprint, then a semicolon, then your application’s package name. For example:
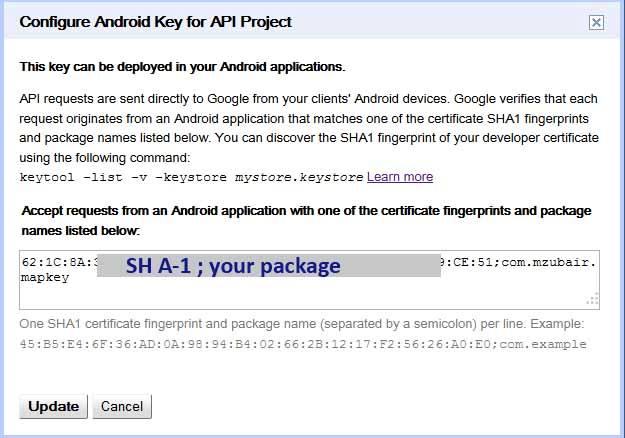
- The Google APIs Console responds by displaying Key for Android apps (with certificates) followed by a forty-character API key, for example:
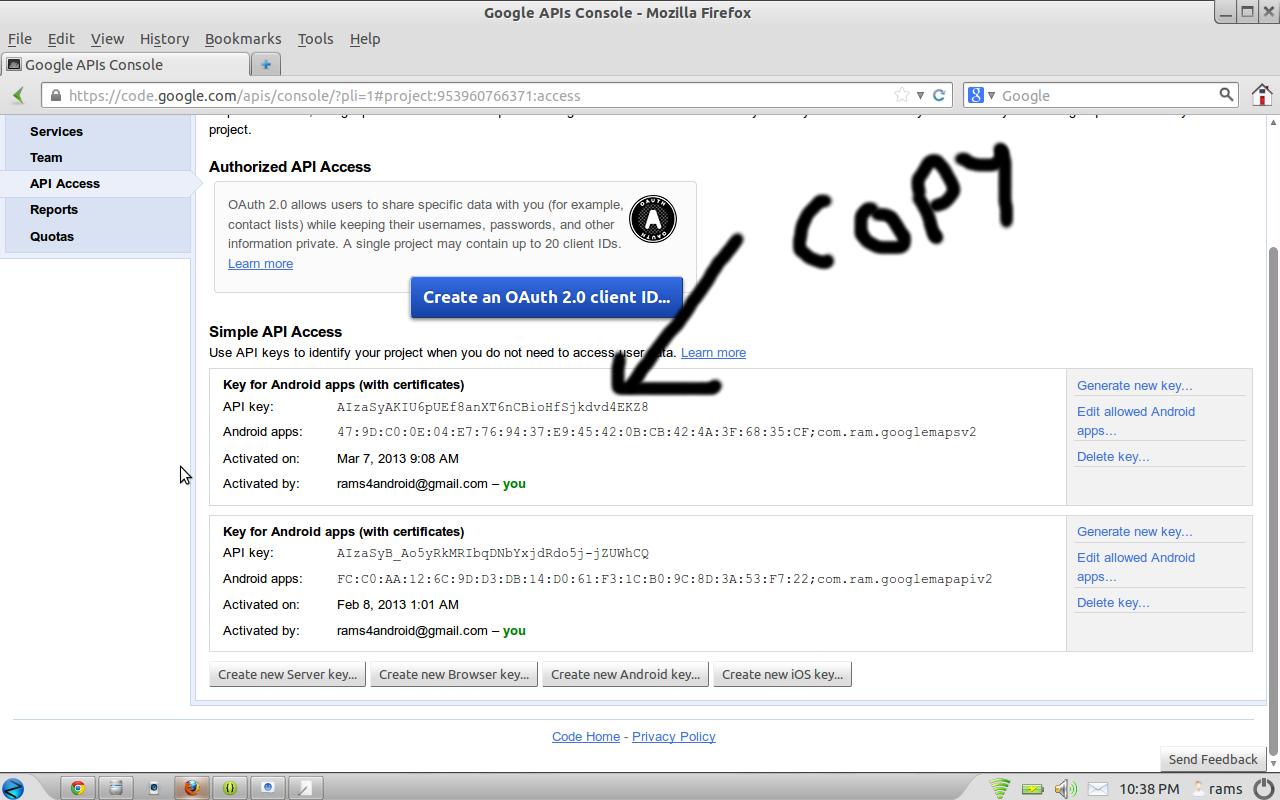
- Copy the API key value
Now there’s just one step to get the Google map running.
3. Specify settings in the android Manifest.xml of your project
Example of an Android Manifest.xml
<?xml version=”1.0″ encoding=”utf-8″?>
<manifest xmlns:android=”http://schemas.android.com/apk/res/android”
package=”com.example.znoozeat”
android:versionCode=”1″
android:versionName=”1.0″ >
<uses-sdk
android:minSdkVersion=”8″
android:targetSdkVersion=”17″ />
<permission
android:name=”in.wptrafficanalyzer.locationgeocodingv2.permission.MAPS_RECEIVE”
android:protectionLevel=”signature”/>
<uses-permission android:name=”in.wptrafficanalyzer.locationgeocodingv2.permission.MAPS_RECEIVE”/>
<uses-permission android:name=”android.permission.INTERNET”/>
<uses-permission android:name=”android.permission.WRITE_EXTERNAL_STORAGE”/>
<uses-permission android:name=”com.google.android.providers.gsf.permission.READ_GSERVICES”/>
<!– The following two permissions are not required to use
Google Maps Android API v2, but are recommended. –>
<uses-permission android:name=”android.permission.ACCESS_COARSE_LOCATION”/>
<uses-permission android:name=”android.permission.ACCESS_FINE_LOCATION”/>
<application
android:allowBackup=”true”
android:icon=”@drawable/ic_launcher”
android:label=”@string/app_name”
android:theme=”@style/CustomTheme” >
<activity
android:name=”com.example.znoozeat.MainActivity”
android:label=”@string/app_name” >
<intent-filter>
<action android:name=”android.intent.action.MAIN” />
<category android:name=”android.intent.category.LAUNCHER” />
</intent-filter>
</activity>
<meta-data
android:name=”com.google.android.maps.v2.API_KEY”
android:value=”AIzaSyCSYYav6TRa8_o0mZjY-Fo-vA_gxwoMbsA”/>
</application>
</manifest>
NB: Specify the Google API key in the <meta-data> tag. Also specify the permission in the <uses-permission > tag as highlighted in the code above.
Requiring OpenGL ES version 2
Because version 2 of the Google Maps Android API requires OpenGL ES version 2, you must add a <uses-feature> element as a child of the <manifest> element in AndroidManifest.xml:
<uses-feature
android:glEsVersion=”0×00020000″
android:required=”true”/>
The OpenGL ES class, walks you through the basics of developing applications that use OpenGL, including setup, drawing objects, moving drawn elements and responding to touch input.
After all these steps are completed, we can now add the map to our application by including <fragment> tag in the layout where you want to add the map.
Example of a layout file is shown below.
main.xml
<RelativeLayout xmlns:android=”http://schemas.android.com/apk/res/android”
xmlns:tools=”http://schemas.android.com/tools”
android:layout_width=”match_parent”
android:layout_height=”match_parent”
android:orientation=”vertical”
tools:context=”.MainActivity” >
<fragment
android:id=”@+id/map”
android:layout_width=”fill_parent”
android:layout_height=”220dp”
android:layout_marginBottom=”17dp”
android:name=”com.google.android.gms.maps.SupportMapFragment”
/>
</RelativeLayout>
MainActivity.java, set the content view to this layout, then create method of the activity class as follows
package com.example.mapdemo;
import android.app.Activity;
import android.os.Bundle;
public class MainActivity extends Activity {
@Override
protected void onCreate(Bundle savedInstanceState) {
super.onCreate(savedInstanceState);
setContentView(R.layout.main);
}
}
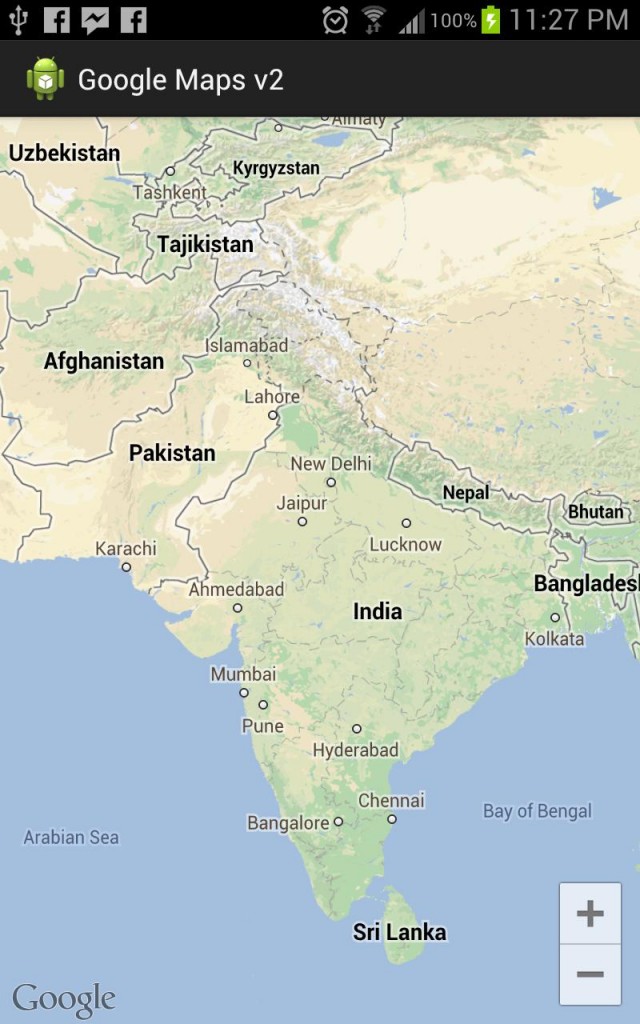
Now your application is ready to run and it will display the map as follows
Author: Georgienna Grace Joseph